Mitigating CVE-2021-4034 (policykit pkexec) vulnerability on CentOS 6

 Kernel and drivers, Legacy, Linux  Comments Off on Mitigating CVE-2021-4034 (policykit pkexec) vulnerability on CentOS 6
Jan 272022
 

CentOS 6 has been end of life since 30.11.2020 – do not use it.

Well, you’re still reading this, so you are using it.

Really really quick mitigation: remove SUID-bit from pkexec: chmod ug-s /usr/bin/pkexec

RedHat provides updates and mitigation steps for RHEL6 (extended support), RHEL7 and RHEL8 on their customer portal – https://access.redhat.com/security/cve/CVE-2021-4034

Based on their excellent documentation it is easy to build a mitigation for CentOS 6 also.

  • Make sure you can still install packages (f.ex use CentOS Vault)
  • Install systemtap & kernel-devel -packages
  • Create pkexec_block.stp with the following content
    probe process("/usr/bin/pkexec").function("main") {
        if (cmdline arg(1) == "")
                        raise(9);
}
  • Compile and install module:
stap -g -F -m stap_pkexec_block pkexec_block.stp
  • Verify with lsmod that stap_pkexec_block -kernel module is loaded.
  • Make sure that module is loaded also after a reboot (copy to right place, run depmod -a & verify).

Sierra Wireless EM7345 on Debian Linux

 Hardware, Kernel and drivers, Linux, Network  Comments Off on Sierra Wireless EM7345 on Debian Linux
May 132018
 

Hardware: Lenovo ThinkPad W550s with Sierra Wireless EM7345

Software: Debian 10 (buster/testing)

Operator: Sonera (Finland)

After Debian installation the modem is recognized, but somehow a working connection just can’t be created:

# mmcli -L

Found 1 modems:
 /org/freedesktop/ModemManager1/Modem/0 [Sierra Wireless Inc.] Sierra Wireless EM7345 4G LTE

# mmcli -m 0

/org/freedesktop/ModemManager1/Modem/0 (device id '<snip>')
-------------------------
Hardware | manufacturer: 'Sierra Wireless Inc.'
| model: 'Sierra Wireless EM7345 4G LTE'
| revision: 'V1.1,11'
| H/W revision: 'unknown'
| supported: 'gsm-umts, lte'
| current: 'gsm-umts, lte'
| equipment id: '<snip>'
-------------------------
System | device: '/sys/devices/pci0000:00/0000:00:14.0/usb2/2-4'
| drivers: 'cdc_acm, cdc_ncm'
| plugin: 'Generic'
| primary port: 'ttyACM0'
| ports: 'enx000011121314 (net), ttyACM0 (at), ttyACM2 (at)'
-------------------------
Numbers | own : 'unknown'
-------------------------
Status | lock: 'none'
| unlock retries: 'sim-pin (3), sim-pin2 (3), sim-puk (10), sim-puk2 (10)'
| state: 'registered'
| power state: 'on'
| access tech: 'lte'
| signal quality: '35' (recent)
-------------------------
Modes | supported: 'allowed: 2g, 3g, 4g; preferred: none'
| current: 'allowed: 2g, 3g, 4g; preferred: none'
-------------------------
Bands | supported: 'unknown'
| current: 'unknown'
-------------------------
IP | supported: 'ipv4, ipv6, ipv4v6'
-------------------------
3GPP | imei: '<snip>'
| enabled locks: 'none'
| operator id: '24491'
| operator name: 'FI SONERA'
| subscription: 'unknown'
| registration: 'home'
| EPS UE mode: 'csps-2'
-------------------------
SIM | path: '/org/freedesktop/ModemManager1/SIM/0'

-------------------------
Bearers | paths: '/org/freedesktop/ModemManager1/Bearer/0'

# nmcli connection add type gsm ifname "" con-name 4G apn internet connection.autoconnect no
Connection '4G' (ef2b6f2d-e072-44cf-a9f8-831b79b179f2) successfully added.

# nmcli connection up 4G
Error: Connection activation failed: Unknown error

daemon.log revealed that modem got stuck on “Connect: ppp0 <–> /dev/ttyACM0” and a bit later on “Couldn’t initialize PDP context with our APN: ‘Serial command timed out'”

Problem seems to be that NCM -mode isn’t actually supported by EM7345 – even though advertised by the firmware (and H/W revision says unknown). Small confirmation for this theory is that Lenovo provides drivers for older Windows versions where MBIM isn’t natively supported.

Let’s override defaults for cdc_ncm and prefer MBIM -mode.

# cat /sys/module/cdc_ncm/parameters/prefer_mbim
N
# echo "options cdc_ncm prefer_mbim=Y" > /etc/modprobe.d/cdc_ncm.conf
# modprobe -r cdc_mbim cdc_ncm
# modprobe cdc_mbim
# cat /sys/module/cdc_ncm/parameters/prefer_mbim
Y
# systemctl restart ModemManager
# mmcli -L

Found 1 modems:
 /org/freedesktop/ModemManager1/Modem/0 [Sierra Wireless Inc.] MBIM [1199:A001]

# mmcli -m 0

/org/freedesktop/ModemManager1/Modem/0 (device id '<snip>')
-------------------------
Hardware | manufacturer: 'Sierra Wireless Inc.'
| model: 'MBIM [1199:A001]'
| revision: 'FIH7160_V1.2_WW_01.1616.01'
| H/W revision: 'XMM7160_V1.2_MBIM_GNSS_NAND_RE'
| supported: 'gsm-umts, lte'
| current: 'gsm-umts, lte'
| equipment id: '<snip>'
-------------------------
System | device: '/sys/devices/pci0000:00/0000:00:14.0/usb2/2-4'
| drivers: 'cdc_acm, cdc_mbim'
| plugin: 'Sierra'
| primary port: 'cdc-wdm0'
| ports: 'wwp0s20u4 (net), cdc-wdm0 (mbim), ttyACM0 (at), ttyACM2 (at)'
-------------------------
Numbers | own : 'unknown'
-------------------------
Status | lock: 'none'
| unlock retries: 'sim-pin2 (3)'
| state: 'registered'
| power state: 'on'
| access tech: 'lte'
| signal quality: '35' (recent)
-------------------------
Modes | supported: 'allowed: 2g, 3g, 4g; preferred: none'
| current: 'allowed: 2g, 3g, 4g; preferred: none'
-------------------------
Bands | supported: 'unknown'
| current: 'unknown'
-------------------------
IP | supported: 'ipv4, ipv6, ipv4v6'
-------------------------
3GPP | imei: '<snip>'
| enabled locks: 'fixed-dialing'
| operator id: '24491'
| operator name: 'FI SONERA'
| subscription: 'unknown'
| registration: 'home'
| EPS UE mode: 'csps-2'
-------------------------
SIM | path: '/org/freedesktop/ModemManager1/SIM/0'

-------------------------
Bearers | paths: 'none'

# nmcli connection up 4G
Error: Timeout expired (90 seconds)

…but still not quite there.
This time daemon.log says that the modem was stuck in 3GPP Registration state loop, idle -> registering -> home -> idle.

Reason for this behavior is Sonera, which (still) doesn’t support IPv6, and somehow fails the handshake if IP type ipv4v6 is offered first. Debug was done by running simple-connect manually:

# systemctl restart ModemManager
# mmcli -m 0 --simple-connect="apn=internet,ip-type=ipv4"
successfully connected the modem
# mmcli -m 0 --simple-disconnect
successfully disconnected all bearers in the modem
# systemctl restart ModemManager
# mmcli -m 0 --simple-connect="apn=internet,ip-type=ipv4v6"
error: couldn't connect the modem: 'Timeout was reached'
# systemctl restart ModemManager
# mmcli -m 0 --simple-connect="apn=internet,ip-type=ipv4"
successfully connected the modem
# mmcli -m 0 --simple-disconnect
successfully disconnected all bearers in the modem

So, how to translate this to network-manager actually handling the connection? Luckily just ignoring IPv6 altogether changes ip-type -setting, so (with nmcli) this is quite easily fixable:

# nmcli connection modify 4G ipv6.method ignore
# nmcli connection up 4G
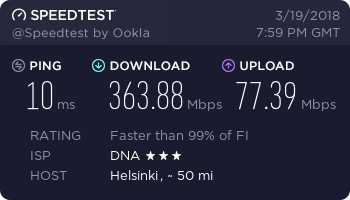
Connection successfully activated (D-Bus active path: /<snip>)

…and finally, a working connection.

Getting more speed out of OpenWRT-enabled TL-WR1043NDv2

 Hardware, Kernel and drivers, Linux, Network  Comments Off on Getting more speed out of OpenWRT-enabled TL-WR1043NDv2
Mar 202018
 

Basic setup and debug

1Gbps/100Mbps -cable connection, router, couple of cat6 cables, laptop & speedtest.net (note: speedtest.net might not give reliable results on high-speed links).


Default speeds (without a router).
Cable modem is setup as a dumb bridge, it’ll just be a media converter between ethernet and the DOCSIS 3.1 -world. First tests were run with laptop hooked up to it with cat6 -cable, public IP-address resided on the laptop and “Hey, this works”. Plugged it into existing infrastructure (WDR4300) and carried on with my normal life.

Then came the next weekend and I had a bit too much time in hand to benchmark – and I found out that the wireless router runs out CPU if I download something big and the speed was capped at about 240Mbps…

What if I’ll change a router?
WDR4300 has an AR9344 CPU running at 560MHz – my reserve WR1043NDv2 has QCA9558 CPU running at 720MHz – a whopping 160MHz (~28.5%) more! I took a look at OpenWRT OpenSSL benchmarks and they confirmed my theory, CPU should be about a quarter faster, but would it translate into real world performance?

This is a bit like comparing apples and oranges, because the CPUs are different, firewall rules are close but not identical, and the latter one doesn’t handle wireless at the same time, but the speed difference is still noticeable.

What if I’ll simplify firewall rules?
Replaced all the default LEDE -firewall rules with just one NAT-rule, just allowed everything, and … about +10% more bandwidth.
How do I get more speed out of a CPU? Overclock!
Had a crazy idea, is it possible to overclock a router? And found out it actually is possible, just backup mtd0 (u-boot) -partition, replace default MHz -values with hex-editor to something else and burn the image back to router. Or use pre-made images or some chinese guys closed-source bootloader.

720MHz to 1GHz (+38%) and +32% more bandwidth with default firewall, nice!

Now let’s try it with a bare minimum firewall…
Same as before, just one NAT-rule.

+11% – and the speed is almost doubled from the start (WDR4300 and ~240Mbps).

What is this “NAT Boost / Hardware NAT” -feature in stock TP-Link firmware?
Back to default CPU speeds, stock firmware has some kind of shortcut for packets going through a NAT. Let’s see if we have..yes, OpenWRT is bringing SFE (Shortcut Forwarding Engine) -support to their later release.

Luckily there were some images ready for testing.

Shortcut forwarding engine, with just a NAT-rule.
Let’s combine that with a minimal firewall setup, just a single NAT-rule.
Shortcut forwarding engine, overclocked.
And what happens if we push the CPU from 720MHz to 1GHz. (With default LEDE-firewall.)
Full speed!
Let’s drop the firewall (use just a single NAT-rule), what’s the maximum attainable speed?

…not bad, just about 3.5 times faster than the original, and just a bit short of “full wirespeed”. But I think I’ll stick with a firewalled version and take that ~80Mbps hit.

Jul 292015
 

Just a quick CPU benchmark with Phoronix test suite, comparing -cpu qemu64 and -cpu host (on Xeon E3-1241v3, 4vCPU/4GB virtuals).

Note: single run (fire & forget), virtual machines on the same physical hardware and benchmarks run simultaneously. YMMV.

Benchmark qemu64 host Higher/Lower better?
pts/stream-1.2.0 [Type: Copy] 14166.98 MB/s 14171.50 MB/s Higher
pts/stream-1.2.0 [Type: Scale] 13964.65 MB/s 14007.75 MB/s Higher
pts/stream-1.2.0 [Type: Triad] 15755.66 MB/s 15851.89 MB/s Higher
pts/stream-1.2.0 [Type: Add] 15730.77 MB/s 15863.64 MB/s Higher
pts/apache-1.6.1 25028.87 Requests Per Second 35859.45 Requests Per Second Higher
pts/john-the-ripper-1.5.1 [Traditional DES] 5849000 Real C/S 7179500 Real C/S Higher
pts/john-the-ripper-1.5.1 [Blowfish] 3170 Real C/S 3249 Real C/S Higher
pts/ttsiod-renderer-1.5.0 102.00 FPS 93.75 FPS Higher
pts/x264-1.9.0 86.56 FPS 94.52 FPS Higher
pts/graphics-magick-1.6.1 [HWB Color Space] 173 Iterations Per Minute 170 Iterations Per Minute Higher
pts/graphics-magick-1.6.1 [Local Adaptive Thresholding] 92 Iterations Per Minute 88 Iterations Per Minute Higher
pts/graphics-magick-1.6.1 [Sharpen] 95 Iterations Per Minute 102 Iterations Per Minute Higher
pts/graphics-magick-1.6.1 [Resizing] 159 Iterations Per Minute 156 Iterations Per Minute Higher
pts/himeno-1.1.0 1722.79 MFLOPS 1840.71 MFLOPS Higher
pts/compress-7zip-1.6.0 10173 MIPS 10291 MIPS Higher
pts/c-ray-1.1.0 44.54 Seconds 39.76 Seconds Higher
pts/compress-pbzip2-1.4.0 11.99 Seconds 13.95 Seconds Lower
pts/smallpt-1.0.1 153 Seconds 153 Seconds Lower
pts/crafty-1.3.0 71.60 Seconds 71.48 Seconds Lower
pts/encode-flac-1.5.0 7.38 Seconds 6.12 Seconds Lower
pts/encode-mp3-1.4.0 11.71 Seconds 11.21 Seconds Lower
pts/ffmpeg-2.4.0 18.99 Seconds 14.37 Seconds Lower
pts/povray-1.1.2 310.35 Seconds 248.59 Seconds Lower
pts/tachyon-1.1.1 26.57 Seconds 17.10 Seconds Lower
pts/openssl-1.9.0 286.50 Signs Per Second 543.67 Signs Per Second Lower
pts/mafft-1.4.0 7.40 Seconds 7.24 Seconds Lower
pts/gcrypt-1.0.3 1793 Microseconds 1647 Microseconds Lower

No wonder why UpCloud changed their parameters, -host usually wins…

Oct 092014
 

Nowadays LVM has  a cache feature, where we can bolt an SSD as a cache-device to a logical volume.

Let’s imagine we have the following setup:

  •  4x 2TB SATA disks in RAID10 configuration, /dev/md0
  • 2x 120GB SSD disks in RAID1 configuration, /dev/md1

First we’ll create the logical volume which we’ll be working with:

# pvcreate /dev/md0
# vgcreate storage /dev/md0
# lvcreate -n volume -L 4TB storage /dev/md0

Next we’ll bolt the cache-device (which should be RAID1-mirrored in case of disk failure) to the volume, first we’ll extend the volume group to contain the SSD-device:

# vgextend storage /dev/md1

Then we’ll create a cache volume and a metadata volume (there’s 1GB free on purpose):

# lvcreate -n metadata -L 1GB storage /dev/md1
# lvcreate -n cache -L 118GB storage /dev/md1

Now we’ll convert these into a cache pool (this will fail if there isn’t at least the same amount free what’s used for metadata, 1GB, because it’s used for failure recovery):

# lvconvert --type cache-pool --poolmetadata storage/metadata storage/cache

Then all what’s left is attaching the cache to a logical volume:

# lvconvert --type cache --cachepool storage/cache storage/volume

It should say “storage/volume is now cached” and lvs output should look something like this:

# lvs
LV VG Attr LSize Pool Origin Data% Meta% Move Log Cpy%Sync Convert
cache storage Cwi---C--- 118.00g
volume storage Cwi-a-C--- 4.0t cache [storage_corig]

Oh, and if you want the cache to survive a reboot, youll need a package which provides /usr/sbin/cache_check -binary. In Debian that’s “thin-provisioning-tools”, and in RHEL/CentOS/derivatives the package is device-mapper-persistent-data.
Tests were performed on Debian testing Jessie and CentOS 7.0.1406 Core in 10/2014. Official documentation can be found here.

Mar 232014
 

Remember: everything you do, happens on your own risk. Steps below CAN CAUSE DATA LOSS. Do not run in production without understanding what you are doing and testing it in development environment beforehand.
And don’t blame me if it doesn’t work for you.

Before: 5 disks in RAID5 with LUKS -encryption and LVM
After: 7 disks in RAID6 with LUKS -encryption and LVM

RAID details: # mdadm –detail /dev/md0

  1. Add spare drive to RAID5-array:
    # mdadm --add /dev/md0 /dev/sdf
  2. Convert RAID5 to RAID6:
    # mdadm --grow /dev/md0 --level=6 --raid-devices=6 --backup-file=/root/raidbackup
  3. WAIT for the array to rebuild itself (will take a while):
    # cat /prod/mdstat
  4. After rebuild, add another drive to RAID6-array:
    # mdadm --add /dev/md0 /dev/sdg
  5. Take the drive into use (adding makes it a spare):
    # mdadm --grow /dev/md0 --level=6 --raid-devices=7 --backup-file=/root/raidbackup
  6. WAIT for the array to rebuild itself (will take a while):
    # cat /proc/mdstat
  7. Grow the RAID6-array to the maximum size:
    # mdadm --grow /dev/md0 --size=max
  8. Open encrypted disk (if not already open):
    # cryptsetup luksOpen /dev/md0 crypt
  9. Resize encrypted disk:
    # cryptsetup resize /dev/mapper/crypt
  10. Resize LVM physical volume:
    # pvresize /dev/mapper/crypt

And now you have more space what you can manage with LVM.

Note: If i remember correctly, 7. can be combined with 5.:

  • # mdadm --grow /dev/md0 --level=6 --raid-devices=7 --size=max --backup-file=/root/raidbackup

– and resizing could be done while the array is rebuilding, but just to be sure we are on the safe side…

Jan 232013
 

After updating a Solaris 11.0 installation to Solaris 11.1 with pkg update – none of servers iSCSI -targets were accessible. Under Windows disk management partition would show up as RAW -partition, data could still be rescued with recovery -software.

After troubleshooting it came clear that i’m not the only one.

Problem is in ImmediateData, and it seems to be resolved in the latest Solaris 11.1 -update (0.175.1.3.0.4.0) – which requires a support contract with Oracle to be downloaded….


If you don’t have access to Oracle Solaris Support -repository – stay in 11.0 until next major update is released, or use a workaround which disables ImmediateData:

Windows (tested):
1. Set the following registry value to 0:
HKLM\SYSTEM\CurrentControlSet\Control\Class{4D36E97B-E325-11CE-BFC1-08002BE10318}\<Instance Number>\Parameters\ImmediateData
2. Reboot

Linux (tested):
1. Disable ImmediateData in iscsid.conf (location depends on distro) or use the same iscsiadm -command as in Solaris
2. Restart the iSCSI service

Solaris (untested):
1. Disable ImmediateData:
# iscsiadm -m node -T ${IQN} -p ${IP}:${PORT},${TPGT} -o update -n node.session.iscsi.ImmediateData -v No
2. Restart the iSCSI service:
# svcadm restart svc:/network/iscsi/initiator:default

ESXi (untested):
1. Backup vmkiscsid.db
2. Edit vmkiscsid.db with sqlite3:
select * from nodes; update nodes set ‘<immediatedatakey>’ = ‘No’
3. Replace vmkiscsid.db with modified version (if you didn’t edit it in place) and reboot server

Jan 202013
 

Debian 7.0(beta4) and i845G/GL didn’t work out-of-the box for me, X crashed without a log as soon as it tried to initialize.

After adding following to /usr/share/X11/xorg.conf.d/05-i845g.conf – everything seems to work:

<code>

Section “Device”
Option    “DRI”    “True”
Option    “Shadow”    “True”
Option    “XvMC”    “False”
Option    “XvPreferOverlay”    “False”
Identifier    “Card0”
Driver    “intel”
VendorName    “Intel Corporation”
BoardName    “82845G/GL [Brookdale-G]/GE Chipset Integrated Graphics Device (rev 01)
BusID    “PCI:0:2:0”
EndSection

</code>

It’s possible that this is fixed when Wheezy is officially released, at least a bug has been reported.


Mar 132012
 

After quick hack-n-slash, it works. It works also on 3.0, if you want 3.1/3.2/3.3 – modify it yourself or wait until i need it 🙂

Needs quite non-intrusive modification to three files:

  • rr268x-linux-src-v1.6-legacy_single/osm/linux/osm_linux.h
    — fix autoconf
  • rr268x-linux-src-v1.6-legacy_single/osm/linux/os_linux.c
    — in 2.6.36 blkdev_get requires two parameters, in 2.6.37 three
  • rr268x-linux-src-v1.6-legacy_single/inc/linux/Makefile.def
    — mask 3.0 as 2.6, can be used to mask 3.1/3.2/3.3 also, and could probably be a lot prettier


Patchfile can be found here: http://macronet.fi/dev/rr268x/ < not recommended, get official fixed version from highpoint (unless you are absolutely sure you want to run v1.4 or v1.6).

* Update 05/2012 *  v1.6 patchfile found in /staging which is modified to mask all 3.x as 2.6

* Update 07/2012 * Just get v1.8 driver which is properly fixed by Highpoint:
http://www.highpoint-tech.com/USA_new/rr2600_download.htm

* Update 01/2013 * There seems to be v1.9 driver released, with following info in README:
NOTE: The latest tested kernel version: 3.5.2.
v1.9.12.0817 08/17/2012
* Fixed a potential bug about fail to recover array.